
THE CLOTHING PHOTO GUIDE
How to photograph clothes for online selling
A useful clothing photo answers a buyer’s questions: What shape is it? What is the fabric like? What condition is it in? Start with a clear record of the actual garment. You can build a small, repeatable setup with a phone, a plain surface and soft window light.
01
Before you take the first photo
Put these basics in place, take a test shot, and inspect it at full size. Fixing the setup once is easier than correcting every image later.
- Prepare the garment: remove lint, fasten buttons and arrange the sleeves and hem naturally. Follow its care label before steaming or ironing.
- Clear the background. Leave enough room around the whole item, including straps, cuffs and long hems.
- Clean the phone lens. Support the phone with a tripod or a steady surface, and use a timer if pressing the shutter moves it.
- Use one consistent light source. Check the preview for harsh shadows, glare and a color cast before continuing.
- Keep the original files. Compare the screen image with the physical item and avoid filters that change its color or texture.
02
Choose a setup that shows the garment clearly
You do not need to use every method. Choose one main view for consistency, then add the detail photographs that it cannot show.
Flat lay
Showing the outline of shirts, knitwear and accessories on a plain surface.
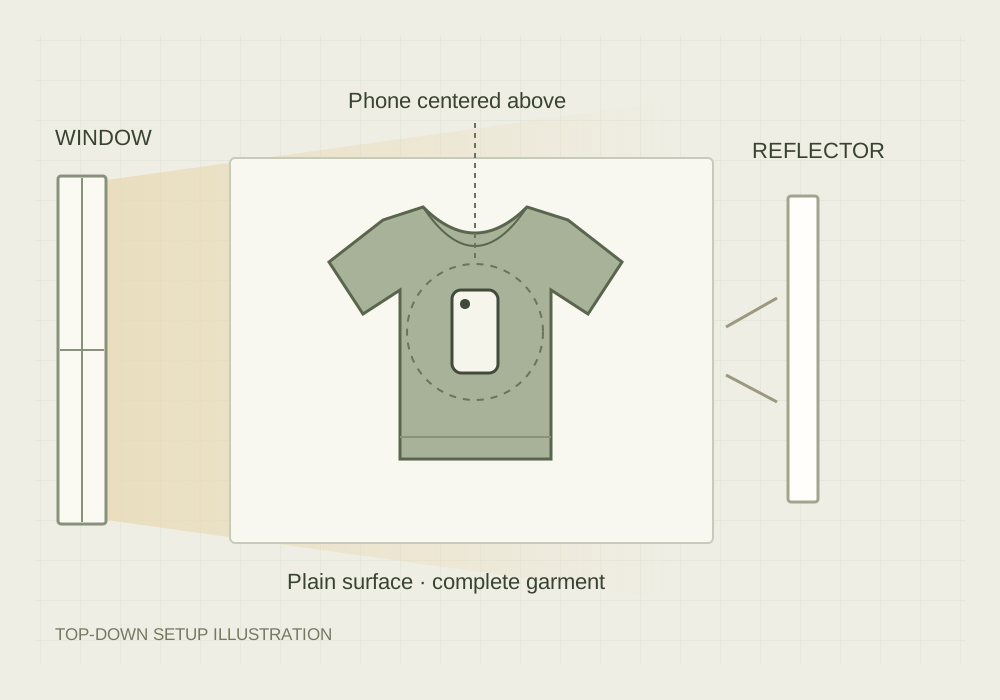
Spread the item without stretching it. Photograph from directly above; a tilted phone can make one end look larger.
Hanging
A repeatable front-and-back view when floor space is limited.
Choose a hanger that suits the shoulders. Check for a distracting hanger shadow and avoid pulling the garment out of shape.
On a person
Showing how an actual garment hangs on a body and how pieces look together.
Get the person’s permission. Keep the clothing visible and include separate close-ups; this view does not establish fit for every buyer.
03
Find soft light, then keep the camera straight
Place the garment near a window with indirect daylight. If direct sun makes hard-edged shadows, change the position or soften the light with a sheer curtain. Avoid mixing daylight with a nearby warm lamp when it gives different parts of the garment different colors.
If one side looks too dark, try a white board opposite the window to bounce light back. Move it and compare a test photo; the aim is readable fabric, not a completely flat surface with every fold erased.
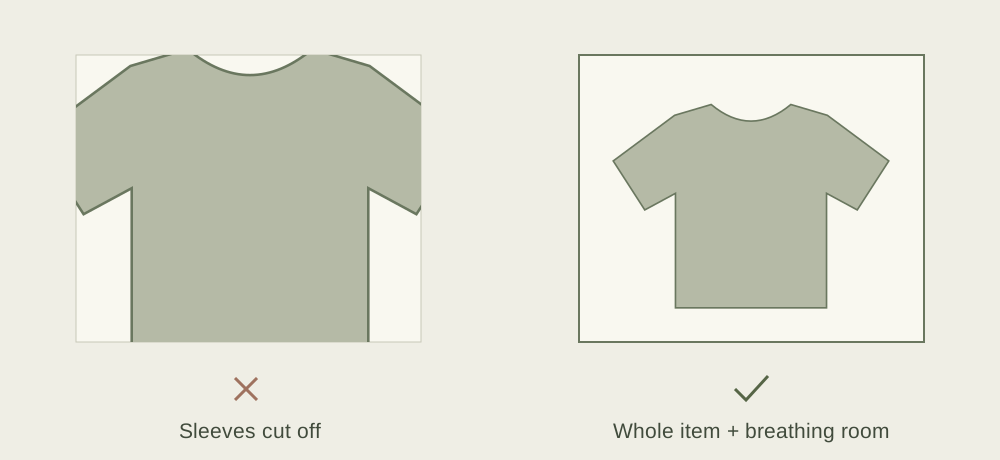
For a flat lay, keep the phone’s camera parallel to the surface. For a hanging garment, face it squarely at a suitable height. Step back enough to include the entire item rather than using a wide, close view that distorts its shape.
Tap the garment to focus and inspect the image for sharpness. Adjust exposure if pale fabric loses texture or dark fabric becomes a solid block. There is no single exposure value that works for every phone, fabric and room.
04
The clothing photos a buyer can use
Build a small set that answers different questions. Do not replace a missing view with another near-identical front shot.
Complete front
Show the full outline, neckline, sleeves and hem. Make this the clean overview a person can understand at a glance.
Complete back
Turn the item over or around. Show back closures, pockets, panels or decoration that the front hides.
Fabric and construction
Move closer for the weave, lining, seams, buttons, zippers or other details. Keep enough context to show where each detail belongs.
Labels
Make size, fiber and care information readable where available. A legible label photo supports an accurate written description.
Condition and flaws
Photograph marks, wear, repairs or damage clearly, with a wider view showing their location. Do not smooth them away in editing.
Useful scale
If dimensions matter, include clearly described measurements and show how you measured. A model photo alone is not a size guide.
05
Fix the setup before you retake everything
The color looks yellow or blue
Remove mixed light sources and try a neutral background. Check white balance if your camera offers it, then compare the new image with the garment in the same light.
The picture looks soft
Clean the lens, steady the phone, add light and refocus on the garment. Zoom into the saved photo to inspect it; a small preview can hide blur.
White fabric loses detail
Lower exposure until folds and texture return. Use a light neutral background with enough contrast to keep the edges visible.
Black fabric becomes a silhouette
Bring soft light closer or add a white reflector. Lift exposure carefully so texture appears without turning the garment gray.
The shape looks distorted
Check whether the camera is tilted or too close. Reposition it squarely, then arrange the garment naturally without stretching the corners.
Shiny fabric has a bright patch
Change the light or camera angle and soften the source. Check that the new angle still shows an honest view of the garment.
06
Using clothing photos as AI references
A clear original photograph is useful before an optional virtual try-on. Keep the actual product photography for your listing; an AI outfit image serves a different purpose.
- Use a complete, sharp clothing reference with the garment separated clearly from the background. Keep original detail photos to compare with any output.
- In TryOnSwap, Outfit swap also needs a person photo. Full look can combine separate clothing and accessory references. Use adult subjects and photos you have permission to upload.
- Review generated colors, seams, prints, logos, proportions and the person’s identity against the originals. AI can change details; its output does not prove physical fit or the condition of an item.
- If you share an AI illustration, distinguish it from the product’s actual photos. Keep visible defects and factual product information in your listing.
Sign-in required. Bring your own person and clothing photos.
Explore the AI outfit generatorClothing photography questions
Can I photograph clothes with my phone?
Yes. Start with a clean lens, enough soft light and a steady phone. Inspect the saved photo at full size for blur and missing fabric detail before shooting the rest of the set.
Do I need a white background?
A plain, uncluttered background is a useful starting point. Choose enough contrast to see the garment’s edges. If you sell on a marketplace, check its current image requirements for the category you use.
Should I use flat lays or a model?
A flat lay helps show the complete outline without arranging a person. A real model can show drape, but does not replace close-ups, condition photos or measurements. Choose the method that answers the missing question.
How many photos should I take?
Use enough distinct views to show the front, back, important details, labels and condition. The useful number depends on the garment and selling platform; duplicate angles do not add much information.
Can I edit out wrinkles or marks?
Prepare ordinary presentation wrinkles before taking the photograph when the care instructions allow it. Do not remove wear, stains, repairs or defects from product photos: buyers need an accurate picture of the item they will receive.